Checkpoint
Provisioning the Kubernetes Engine Cluster
/ 20
Creating the RBAC rules
/ 10
Create server in each namespace
/ 15
Deploying the sample application
/ 20
Fixing the service account name
/ 10
Identifying the application's role and permissions
/ 15
Teardown
/ 10
Using Role-based Access Control in Kubernetes Engine
GSP493

Overview
This lab covers the usage and debugging of role-based access control (RBAC) in a Kubernetes Engine cluster.
While RBAC resource definitions are standard across all Kubernetes platforms, their interaction with underlying authentication and authorization providers needs to be understood when building on any cloud provider.
RBAC is a powerful security mechanism that provides great flexibility in how you restrict operations within a cluster. This lab will cover two use cases for RBAC:
- Assigning different permissions to user personas, namely owners and auditors.
- Granting limited API access to an application running within your cluster.
Since RBAC's flexibility can occasionally result in complex rules, common steps for troubleshooting RBAC are included as part of scenario 2.
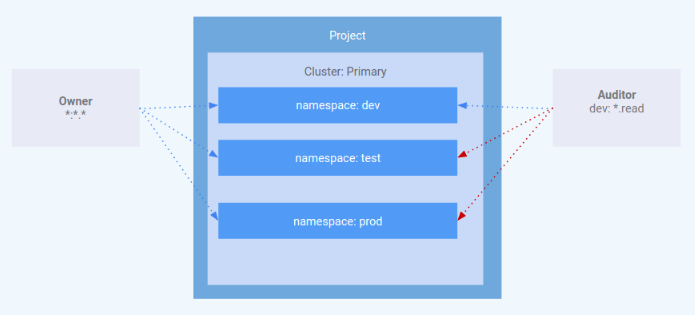
Architecture
This lab focuses on the use of RBAC within a Kubernetes Engine cluster. It demonstrates how varying levels of cluster privilege can be granted to different user personas. You will provision two service accounts to represent user personas and three namespaces: dev, test, and prod. The "owner" persona will have read-write access to all three namespaces, while the "auditor" persona will have read-only access and be restricted to the dev namespace.
This lab was created by GKE Helmsman engineers to help you grasp a better understanding of Using role-based access controls in GKE. You can view this demo on Github. We encourage any and all to contribute to our assets!
Setup and requirements
Before you click the Start Lab button
Read these instructions. Labs are timed and you cannot pause them. The timer, which starts when you click Start Lab, shows how long Google Cloud resources will be made available to you.
This hands-on lab lets you do the lab activities yourself in a real cloud environment, not in a simulation or demo environment. It does so by giving you new, temporary credentials that you use to sign in and access Google Cloud for the duration of the lab.
To complete this lab, you need:
- Access to a standard internet browser (Chrome browser recommended).
- Time to complete the lab---remember, once you start, you cannot pause a lab.
How to start your lab and sign in to the Google Cloud console
-
Click the Start Lab button. If you need to pay for the lab, a pop-up opens for you to select your payment method. On the left is the Lab Details panel with the following:
- The Open Google Cloud console button
- Time remaining
- The temporary credentials that you must use for this lab
- Other information, if needed, to step through this lab
-
Click Open Google Cloud console (or right-click and select Open Link in Incognito Window if you are running the Chrome browser).
The lab spins up resources, and then opens another tab that shows the Sign in page.
Tip: Arrange the tabs in separate windows, side-by-side.
Note: If you see the Choose an account dialog, click Use Another Account. -
If necessary, copy the Username below and paste it into the Sign in dialog.
{{{user_0.username | "Username"}}} You can also find the Username in the Lab Details panel.
-
Click Next.
-
Copy the Password below and paste it into the Welcome dialog.
{{{user_0.password | "Password"}}} You can also find the Password in the Lab Details panel.
-
Click Next.
Important: You must use the credentials the lab provides you. Do not use your Google Cloud account credentials. Note: Using your own Google Cloud account for this lab may incur extra charges. -
Click through the subsequent pages:
- Accept the terms and conditions.
- Do not add recovery options or two-factor authentication (because this is a temporary account).
- Do not sign up for free trials.
After a few moments, the Google Cloud console opens in this tab.

Activate Cloud Shell
Cloud Shell is a virtual machine that is loaded with development tools. It offers a persistent 5GB home directory and runs on the Google Cloud. Cloud Shell provides command-line access to your Google Cloud resources.
- Click Activate Cloud Shell
at the top of the Google Cloud console.
When you are connected, you are already authenticated, and the project is set to your Project_ID,
gcloud is the command-line tool for Google Cloud. It comes pre-installed on Cloud Shell and supports tab-completion.
- (Optional) You can list the active account name with this command:
- Click Authorize.
Output:
- (Optional) You can list the project ID with this command:
Output:
gcloud, in Google Cloud, refer to the gcloud CLI overview guide.
Set your region and zone
Certain Compute Engine resources live in regions and zones. A region is a specific geographical location where you can run your resources. Each region has one or more zones.
Run the following to set a region and zone for your lab (you can use the region/zone that's best for you):
Task 1. Clone demo
- Download the resources needed for this lab by running:
- Change into the extracted directory:
Provisioning the Kubernetes Engine cluster
Next, apply the Terraform configuration.
- From within the project root, use
maketo apply the Terraform configuration:
The setup of this demo takes up to 10-15 minutes. If there is no error the best thing to do is keep waiting. The execution of make create should not be interrupted.
- While the resources are building, once you see a
google_compute_instanceget created, you can check on the progress in the Console by going to Compute Engine > VM instances. Use the Refresh button on the VM instances page to view the most up to date information.
Once complete, Terraform outputs a message indicating successful creation of the cluster.
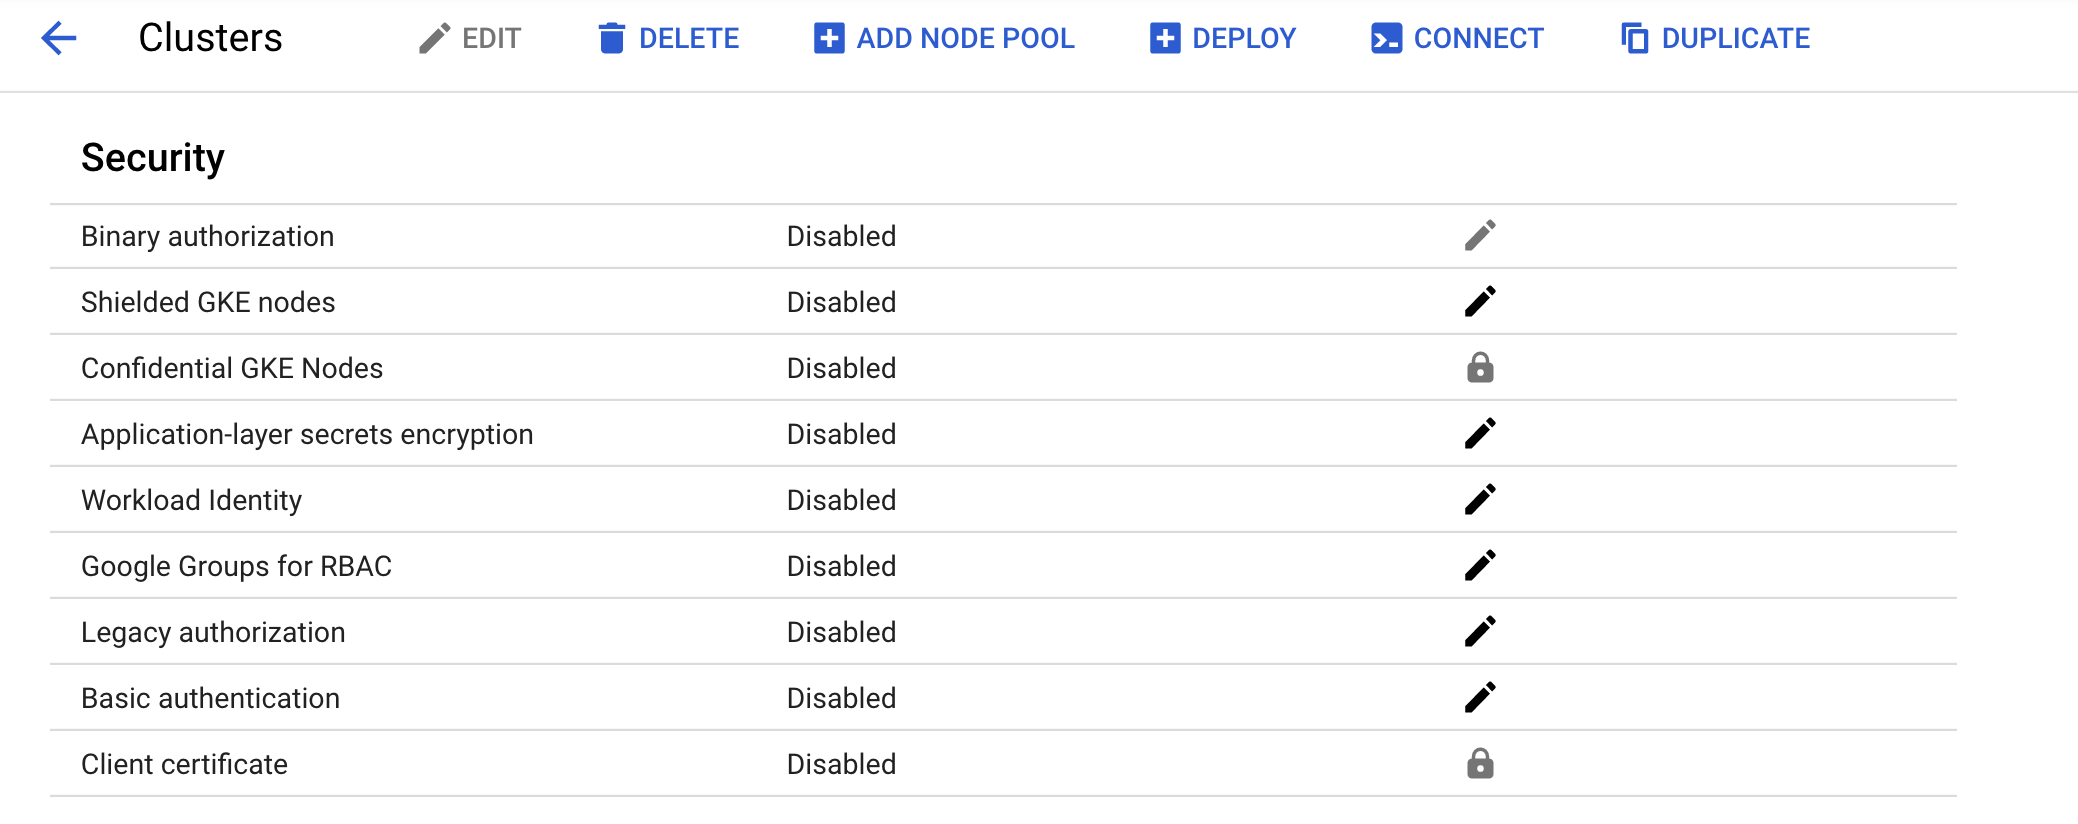
- Confirm the cluster was created successfully in the Console. Go to Navigation menu > Kubernetes Engine > Clusters and click on the cluster that was created. Ensure that Legacy Authorization is disabled for the new cluster.
Click Check my progress to verify the objective.
Task 2. Scenario 1: Assigning permissions by user persona
IAM - role
A role named kube-api-ro-xxxxxxxx (where xxxxxxxx is a random string) has been created with the permissions below as part of the Terraform configuration in iam.tf. These permissions are the minimum required for any user that requires access to the Kubernetes API.
- container.apiServices.get
- container.apiServices.list
- container.clusters.get
- container.clusters.getCredentials
Simulating users
Three service accounts have been created to act as Test Users:
- admin: has admin permissions over the cluster and all resources
- owner: has read-write permissions over common cluster resources
- auditor: has read-only permissions within the dev namespace only
- Run the following:
Three test hosts have been provisioned by the Terraform script. Each node has kubectl and gcloud installed and configured to simulate a different user persona.
- gke-tutorial-admin: kubectl and gcloud are authenticated as a cluster administrator.
-
gke-tutorial-owner: simulates the
owneraccount -
gke-tutorial-auditor: simulates the
auditoraccount
- Run the following:
Output:
Creating the RBAC rules
Create the Namespaces, Roles, and RoleBindings by logging into the admin instance and applying the rbac.yaml manifest.
- SSH to the admin:
Existing versions of kubectl and custom Kubernetes clients contain provider-specific code to manage authentication between the client and Google Kubernetes Engine. Starting with v1.26, this code will no longer be included as part of the OSS kubectl. GKE users will need to download and use a separate authentication plugin to generate GKE-specific tokens. This new binary, gke-gcloud-auth-plugin, uses the Kubernetes Client-go Credential Plugin mechanism to extend kubectl’s authentication to support GKE. For more information, you can check out the following documentation.
To have kubectl use the new binary plugin for authentication instead of using the default provider-specific code, use the following steps.
- Once connected, run the following command to install the
gke-gcloud-auth-pluginon the VM.
- Set
export USE_GKE_GCLOUD_AUTH_PLUGIN=Truein~/.bashrc:
- Run the following command:
- Run the following command to force the config for this cluster to be updated to the Client-go Credential Plugin configuration.
On success, you should see this message pop up:
The newly-created cluster will now be available for the standard kubectl commands on the bastion.
- Create the namespaces, roles, and bindings:
Output:
Click Check my progress to verify the objective.
Managing resources as the owner
- Open a new Cloud Shell terminal by clicking the + at the top of the terminal window.
You will now SSH into the owner instance and create a simple deployment in each namespace.
- SSH to the "owner" instance:
-
When prompted about the zone, enter
n, so the default zone is used. -
Install gke-gcloud-auth-plugin:
- Create a server in each namespace, first
dev:
Output:
- And then
prod:
Output:
- Then
test:
Output:
Click Check my progress to verify the objective.
As the owner, you will also be able to view all pods.
- On the "owner" instance list all
hello-serverpods in all namespaces by running:
Output:
Viewing resources as the auditor
Now you will open a new terminal, SSH into the auditor instance, and try to view all namespaces.
-
Open a new Cloud Shell terminal by clicking the + at the top of the terminal window.
-
SSH to the "auditor" instance:
-
When prompted about the zone, enter
n, so the default zone is used. -
Install gke-gcloud-auth-plugin:
- On the "auditor" instance, list all
hello-serverpods in all namespaces with the following:
You should see an error like the following:
The error indicates that you don't have sufficient permissions. The auditor role is restricted to viewing only the resources in the dev namespace, so you'll need to specify the namespace when viewing resources.
Now attempt to view pods in the dev namespace.
- On the "auditor" instance run the following:
Output:
- Try to view pods in the test namespace:
Output:
- Attempt to view pods in the prod namespace:
Output:
Finally, verify that the auditor has read-only access by trying to create and delete a deployment in the dev namespace.
- On the "auditor" instance attempt to create a deployment:
Output:
- On the "auditor" instance, attempt to delete the deployment:
Output:
Task 3. Scenario 2: Assigning API permissions to a cluster application
In this scenario you'll go through the process of deploying an application that requires access to the Kubernetes API as well as configure RBAC rules while troubleshooting some common use cases.
Deploying the sample application
The sample application will run as a single pod that periodically retrieves all pods in the default namespace from the API server and then applies a timestamp label to each one.
- From the admin instance (this should be your first Cloud Shell tab), deploy the
pod-labelerapplication. This will also deploy a Role, ServiceAccount, and RoleBinding for the pod:
Output:
Click Check my progress to verify the objective.
Diagnosing an RBAC misconfiguration
Now check the status of the pod. Once the container has finished creating, you'll see it error out. Investigate the error by inspecting the pods' events and logs.
- On the admin instance check the pod status:
Output:
- On the admin instance, view the pod event stream by running:
You should see:
- On the admin instance, run the following to check the pod's logs:
Output:
Based on this error, you can see a permissions error when trying to list pods via the API.
- The next step is to confirm you are using the correct ServiceAccount.
Fixing the serviceAccountName
By inspecting the pod's configuration, you can see it is using the default ServiceAccount rather than the custom Service Account.
- On the admin instance, run:
Output:
The pod-labeler-fix-1.yaml file contains the fix in the deployment's template spec:
Next you'll apply the fix and view the resulting change.
- On the admin instance, apply the fix 1 by running:
Output:
- View the change in the deployment configuration:
Changes in the output:
Click Check my progress to verify the objective.
Diagnosing insufficient privileges
Once again, check the status of your pod and you'll notice it is still erring out, but with a different message this time.
- On the admin instance check the status of your pod:
Output:
You may need to run the previous command again to see this output.
- On the admin instance, check the pod's logs:
Output:
Since this is failing on a PATCH operation, you can also see the error in Stackdriver. This is useful if the application logs are not sufficiently verbose.
-
In the Console, select Navigation menu, and in the Operations section, click on Logging.
-
In the Query builder dialog box, paste the following code and click Run Query:
- Click on a down arrow next to a log record and explore the details.
Identifying the application's role and permissions
Use the ClusterRoleBinding to find the ServiceAccount's role and permissions.
- On the admin instance, inspect the
rolebindingdefinition:
Output:
The RoleBinding shows you need to inspect the pod-labeler role in the default namespace. Here you can see the role is only granted permission to list pods.
- On the admin instance, inspect the
pod-labelerrole definition:
Output:
Since the application requires PATCH permissions, you can add it to the "verbs" list of the role, which you will do now.
The pod-labeler-fix-2.yaml file contains the fix in it's rules/verbs section:
Apply the fix and view the resulting configuration.
- On the admin instance, apply
fix-2:
Output:
Click Check my progress to verify the objective.
- On the admin instance, view the resulting change:
Output:
Because the pod-labeler may be in a back-off loop, the quickest way to test the fix is to kill the existing pod and let a new one take its place.
- On the admin instance, run the following to kill the existing pod and let the deployment controller replace it:
Output:
Verifying successful configuration
Finally, verify the new pod-labeler is running and check that the "updated" label has been applied.
- On the admin instance, list all pods and show their labels:
Output:
- View the pod's logs to verify there are no longer any errors:
Output:
Key take-aways
- Container and API server logs will be your best source of clues for diagnosing RBAC issues.
- Use RoleBindings or ClusterRoleBindings to determine which role is specifying the permissions for a pod.
- API server logs can be found in Stackdriver under the Kubernetes resource.
- Not all API calls will be logged to Stackdriver. Frequent, or verbose payloads are omitted by the Kubernetes' audit policy used in Kubernetes Engine. The exact policy will vary by Kubernetes version, but can be found in the open source codebase.
Task 4. Teardown
When you are finished, and you are ready to clean up the resources that were created, run the following command to remove all resources:
-
Log out of the bastion host by typing
exit. -
Run the following to destroy the environment:
Output:
Click Check my progress to verify the objective.
Task 5. Troubleshooting in your own environment
The install script fails with a Permission denied when running Terraform
The credentials that Terraform is using do not provide the necessary permissions to create resources in the selected projects. Ensure that the account listed in gcloud config list has necessary permissions to create resources. If it does, regenerate the application default credentials using gcloud auth application-default login.
Invalid fingerprint error during Terraform operations
Terraform occasionally complains about an invalid fingerprint, when updating certain resources. Re-run the command if you get an error with the message: Error: Error applying plan and then lists these errors:
module.network.google_compute_subnetwork.cluster-subnet: 1 error(s) occurredgoogle.compute_subnetwork.cluster-subnet: Error updating subnetwork/kube-net-subnet: googleapi: Error412: Invalid fingerprint, conditionNotMet
Congratulations!
You've explored role-based access (RBAC) control by assigning different permissions to user personas and granting limited API access to an application running in your cluster.
Finish Your Quest
This self-paced lab is part of the Google Kubernetes Engine Best Practices: Security quest. A quest is a series of related labs that form a learning path. Completing this quest earns you a badge to recognize your achievement. You can make your badge or badges public and link to them in your online resume or social media account. Enroll in this quest or any quest that contains this lab and get immediate completion credit. See the Google Cloud Skills Boost catalog to see all available quests.
Take your next lab
Continue your Quest with Google Kubernetes Engine Security: Binary Authorization, or check out the following:
Next steps / Learn more
- Configure role-based access control
- Create IAM policies
- Kubernetes Service Account Authentication
- Terraform Documentation
Google Cloud training and certification
...helps you make the most of Google Cloud technologies. Our classes include technical skills and best practices to help you get up to speed quickly and continue your learning journey. We offer fundamental to advanced level training, with on-demand, live, and virtual options to suit your busy schedule. Certifications help you validate and prove your skill and expertise in Google Cloud technologies.
Manual Last Updated October 09, 2023
Lab Last Tested October 09, 2023
Copyright 2024 Google LLC. This software is provided as-is, without warranty or representation for any use or purpose. Your use of it is subject to your agreement with Google.