Checkpoints
Create a Cloud Storage bucket
/ 25
Create Cloud Composer environment
/ 25
Uploading the DAG to Cloud Storage
/ 25
Exploring DAG runs
/ 25
Cloud Composer: Qwik Start - Console
- GSP261
- Overview
- Objectives
- Setup and requirements
- Task 1. Create Cloud Composer environment
- Task 2. Airflow and core concepts
- Task 3. Defining the workflow
- Task 4. Viewing environment information
- Task 5. Using the Airflow UI
- Task 6. Setting Airflow variables
- Task 7. Uploading the DAG to Cloud Storage
- Test your knowledge
- Delete Cloud Composer Environment
- Congratulations!
- Next steps
GSP261

Overview
Workflows are a common theme in data analytics - they involve ingesting, transforming, and analyzing data to figure out the meaningful information within. In Google Cloud, the tool for hosting workflows is Cloud Composer which is a hosted version of the popular open source workflow tool Apache Airflow.
In this lab, you use the Cloud Console to set up a Cloud Composer environment. You then use Cloud Composer to go through a simple workflow that verifies the existence of a data file, creates a Cloud Dataproc cluster, runs an Apache Hadoop wordcount job on the Cloud Dataproc cluster, and deletes the Cloud Dataproc cluster afterwards.
Objectives
In this lab, you will learn how to perform the following tasks:
- Use Cloud Console to create the Cloud Composer environment
- View and run the DAG (Directed Acyclic Graph) in the Airflow web interface
- View the results of the wordcount job in storage
Setup and requirements
Before you click the Start Lab button
Read these instructions. Labs are timed and you cannot pause them. The timer, which starts when you click Start Lab, shows how long Google Cloud resources will be made available to you.
This hands-on lab lets you do the lab activities yourself in a real cloud environment, not in a simulation or demo environment. It does so by giving you new, temporary credentials that you use to sign in and access Google Cloud for the duration of the lab.
To complete this lab, you need:
- Access to a standard internet browser (Chrome browser recommended).
- Time to complete the lab---remember, once you start, you cannot pause a lab.
How to start your lab and sign in to the Google Cloud console
-
Click the Start Lab button. If you need to pay for the lab, a pop-up opens for you to select your payment method. On the left is the Lab Details panel with the following:
- The Open Google Cloud console button
- Time remaining
- The temporary credentials that you must use for this lab
- Other information, if needed, to step through this lab
-
Click Open Google Cloud console (or right-click and select Open Link in Incognito Window if you are running the Chrome browser).
The lab spins up resources, and then opens another tab that shows the Sign in page.
Tip: Arrange the tabs in separate windows, side-by-side.
Note: If you see the Choose an account dialog, click Use Another Account. -
If necessary, copy the Username below and paste it into the Sign in dialog.
{{{user_0.username | "Username"}}} You can also find the Username in the Lab Details panel.
-
Click Next.
-
Copy the Password below and paste it into the Welcome dialog.
{{{user_0.password | "Password"}}} You can also find the Password in the Lab Details panel.
-
Click Next.
Important: You must use the credentials the lab provides you. Do not use your Google Cloud account credentials. Note: Using your own Google Cloud account for this lab may incur extra charges. -
Click through the subsequent pages:
- Accept the terms and conditions.
- Do not add recovery options or two-factor authentication (because this is a temporary account).
- Do not sign up for free trials.
After a few moments, the Google Cloud console opens in this tab.

Activate Cloud Shell
Cloud Shell is a virtual machine that is loaded with development tools. It offers a persistent 5GB home directory and runs on the Google Cloud. Cloud Shell provides command-line access to your Google Cloud resources.
- Click Activate Cloud Shell
at the top of the Google Cloud console.
When you are connected, you are already authenticated, and the project is set to your Project_ID,
gcloud is the command-line tool for Google Cloud. It comes pre-installed on Cloud Shell and supports tab-completion.
- (Optional) You can list the active account name with this command:
- Click Authorize.
Output:
- (Optional) You can list the project ID with this command:
Output:
gcloud, in Google Cloud, refer to the gcloud CLI overview guide.
Task 1. Create Cloud Composer environment
In this section, you create a Cloud Composer environment.
-
Go to Navigation menu (
) > Composer.
-
Click CREATE ENVIRONMENT and select Composer 2 from the dropdown.
-
Set the following for your environment:
-
Name:
highcpu -
Location:
-
Image version: composer-2.6.2-airflow-2.6.3
-
Leave all other settings as default.
Grant Necessary Permissions to Cloud Composer Service Account
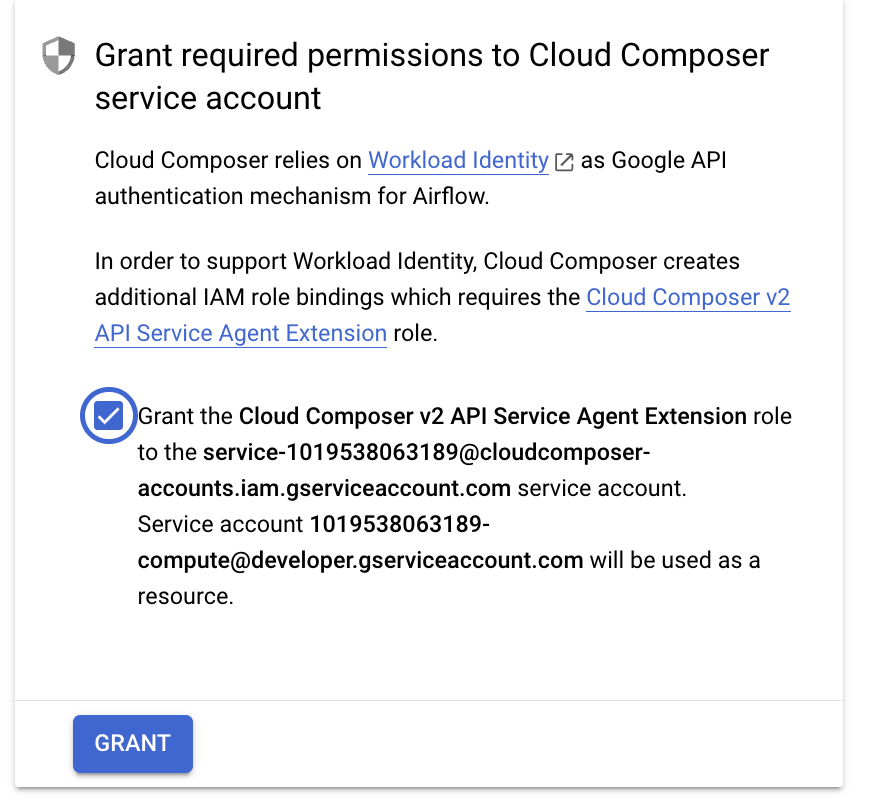
Click on the checkbox and then click on the Grant button.
This will Grant the Cloud Composer v2 API Service Agent Extension role to the service-(project-number)@cloudcomposer-accounts.iam.gserviceaccount.com.
- Click CREATE.
The environment creation process is completed when the green checkmark displays to the left of the environment name on the Environments page in the Cloud Console.
It can take 10-15 minutes for the environment to complete the setup process. Continue with the lab while the environment spins up.
Create a Cloud Storage bucket
Create a Cloud Storage bucket in your project. This buckets will be used as output for the Hadoop job from Dataproc.
-
Go to Navigation menu > Cloud Storage > Buckets and then click CREATE.
-
Give your bucket the name
, make the bucket in the region, then click CREATE.
Remember the Cloud Storage bucket name (your Project ID) as you'll use it as an Airflow variable later in the lab.
Click Check my progress to verify the objective.
Task 2. Airflow and core concepts
While waiting for your Composer environment to get created, review some terms that are used with Airflow.
Airflow is a platform to programmatically author, schedule and monitor workflows.
Use Airflow to author workflows as directed acyclic graphs (DAGs) of tasks. The airflow scheduler executes your tasks on an array of workers while following the specified dependencies.
Core concepts
A Directed Acyclic Graph is a collection of all the tasks you want to run, organized in a way that reflects their relationships and dependencies.
The description of a single task, it is usually atomic. For example, the BashOperator is used to execute bash command.
A parameterised instance of an Operator; a node in the DAG.
A specific run of a task; characterized as: a DAG, a Task, and a point in time. It has an indicative state: running, success, failed, skipped, ...
You can read more about the concepts in the Concepts documentation.
Task 3. Defining the workflow
Now let's discuss the workflow you'll be using. Cloud Composer workflows are comprised of DAGs (Directed Acyclic Graphs). DAGs are defined in standard Python files that are placed in Airflow's DAG_FOLDER. Airflow will execute the code in each file to dynamically build the DAG objects. You can have as many DAGs as you want, each describing an arbitrary number of tasks. In general, each one should correspond to a single logical workflow.
-
Open a new Cloud Shell window by clicking on the Activate Cloud Shell icon in the top right corner of the Cloud Console.
-
In Cloud shell, use nano (a code editor) to create the file
hadoop_tutorial.py:
- Below is the code for the hadoop_tutorial.py workflow, also referred to as the DAG. Paste the following code into
hadoop_tutorial.pyfile.
- Save and exit nano by pressing CTRL+O, ENTER, CTRL+X, in that order.
To orchestrate the three workflow tasks, the DAG imports the following operators:
-
DataprocClusterCreateOperator: Creates a Cloud Dataproc cluster. -
DataProcHadoopOperator: Submits a Hadoop wordcount job and writes results to a Cloud Storage bucket. -
DataprocClusterDeleteOperator: Deletes the cluster to avoid incurring ongoing Compute Engine charges.
The tasks run sequentially, which you can see in this section of the file:
The name of the DAG is hadoop_tutorial, and the DAG runs once each day:
Because the start_date that is passed in to default_dag_args is set to yesterday, Cloud Composer schedules the workflow to start immediately after the DAG uploads.
Task 4. Viewing environment information
-
Go back to Composer to check on the status of your environment.
-
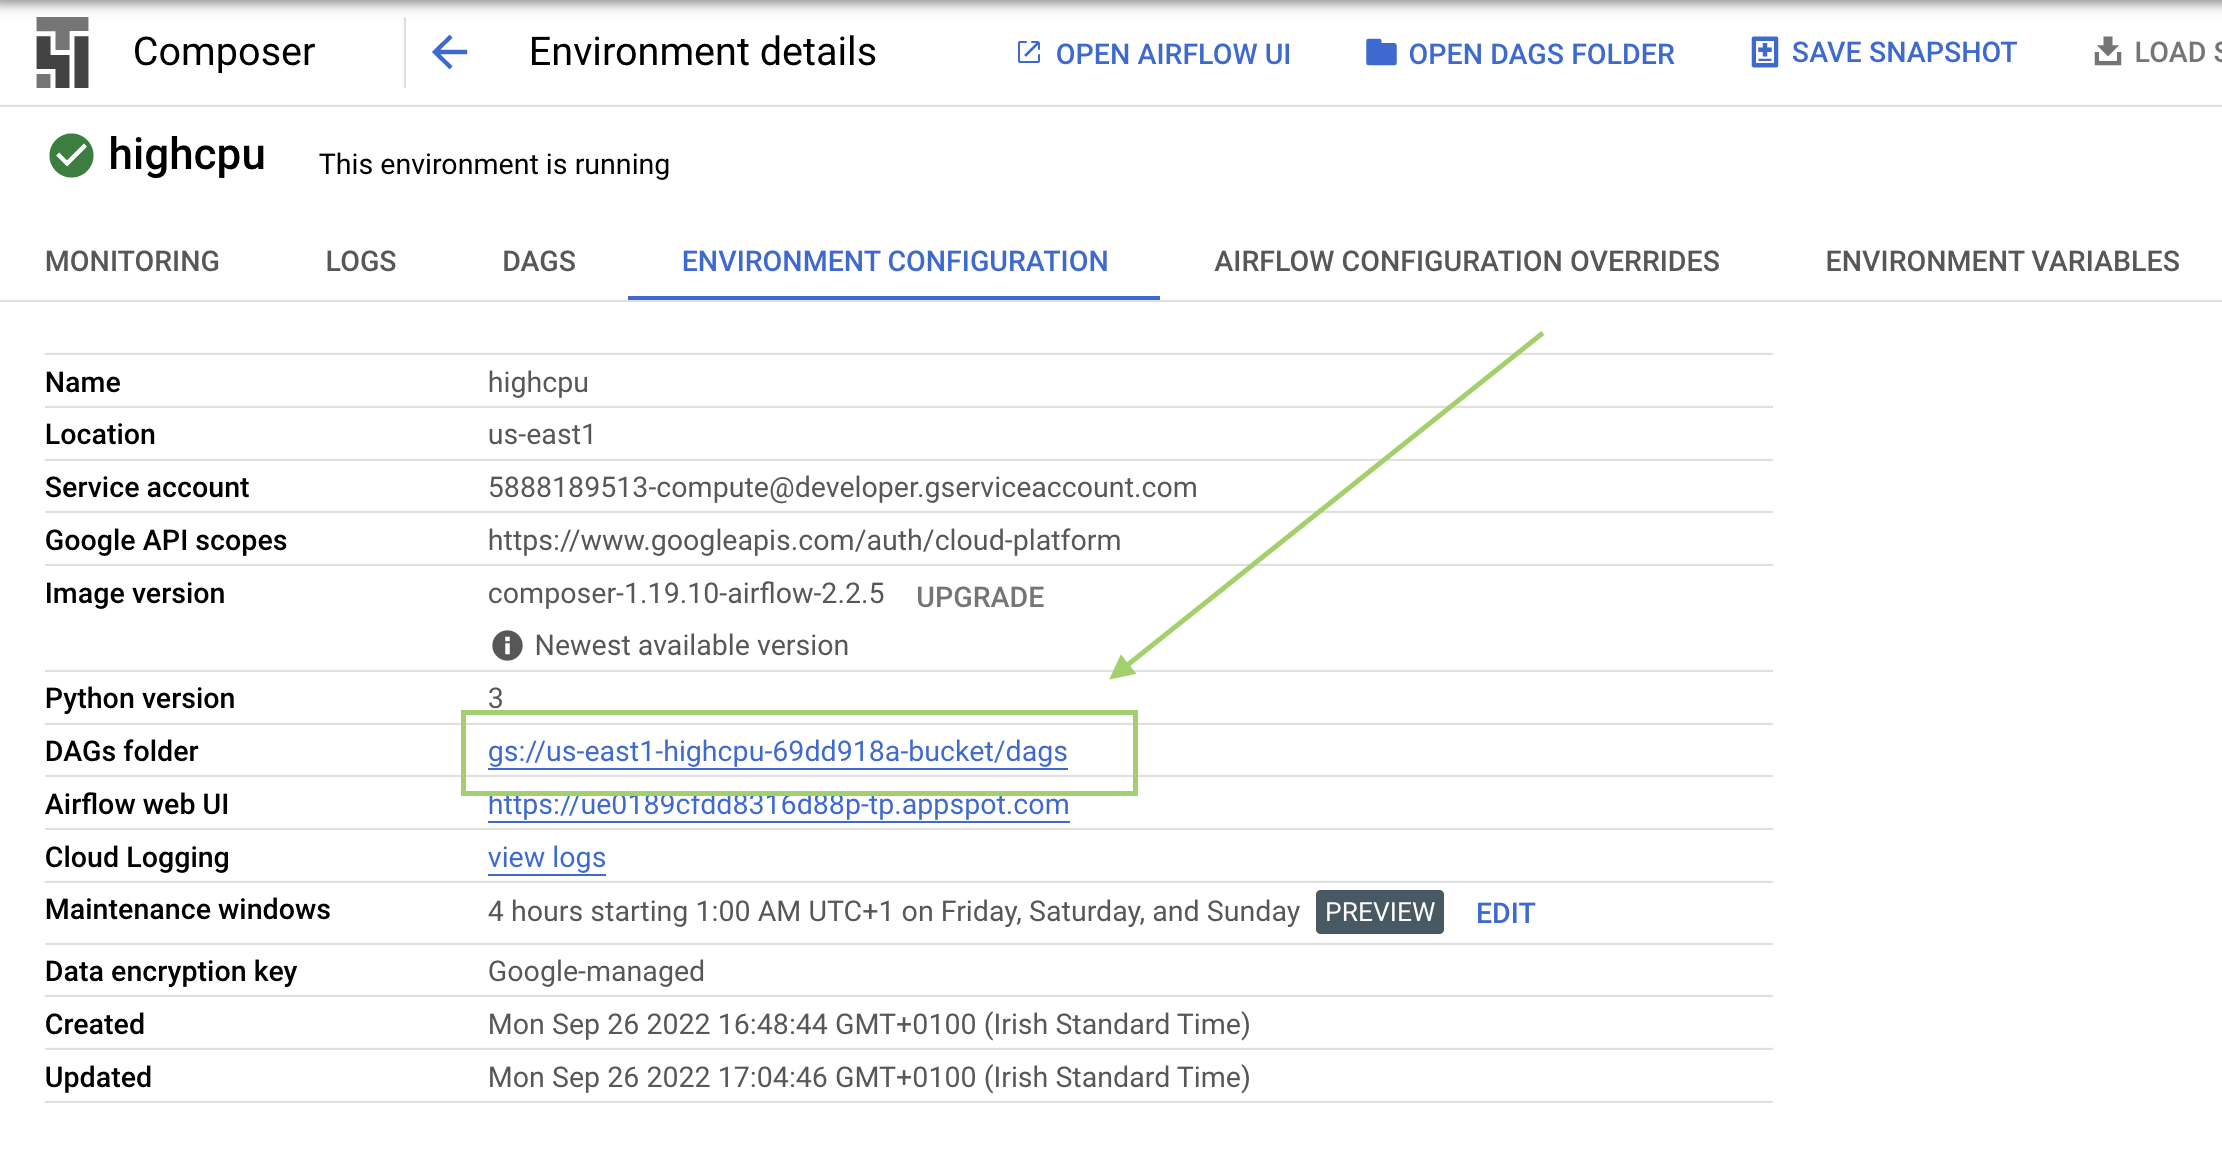
Once your environment has been created, click the name of the environment (highcpu) to see its details.
On the Environment Configuration you'll see information such as the Airflow web interface URL, Kubernetes Engine cluster ID, and a link to the DAGs folder, which is stored in your bucket.
/dags folder.Click Check my progress to verify the objective.
Task 5. Using the Airflow UI
To access the Airflow web interface using the Cloud Console:
- Go back to the Environments page.
- In the Airflow webserver column for the environment, click Airflow.
- Click on your lab credentials.
- The Airflow web interface opens in a new browser window.
Task 6. Setting Airflow variables
Airflow variables are an Airflow-specific concept that is distinct from environment variables.
-
Select Admin > Variables from the Airflow menu bar, then click + (Add a new record).
-
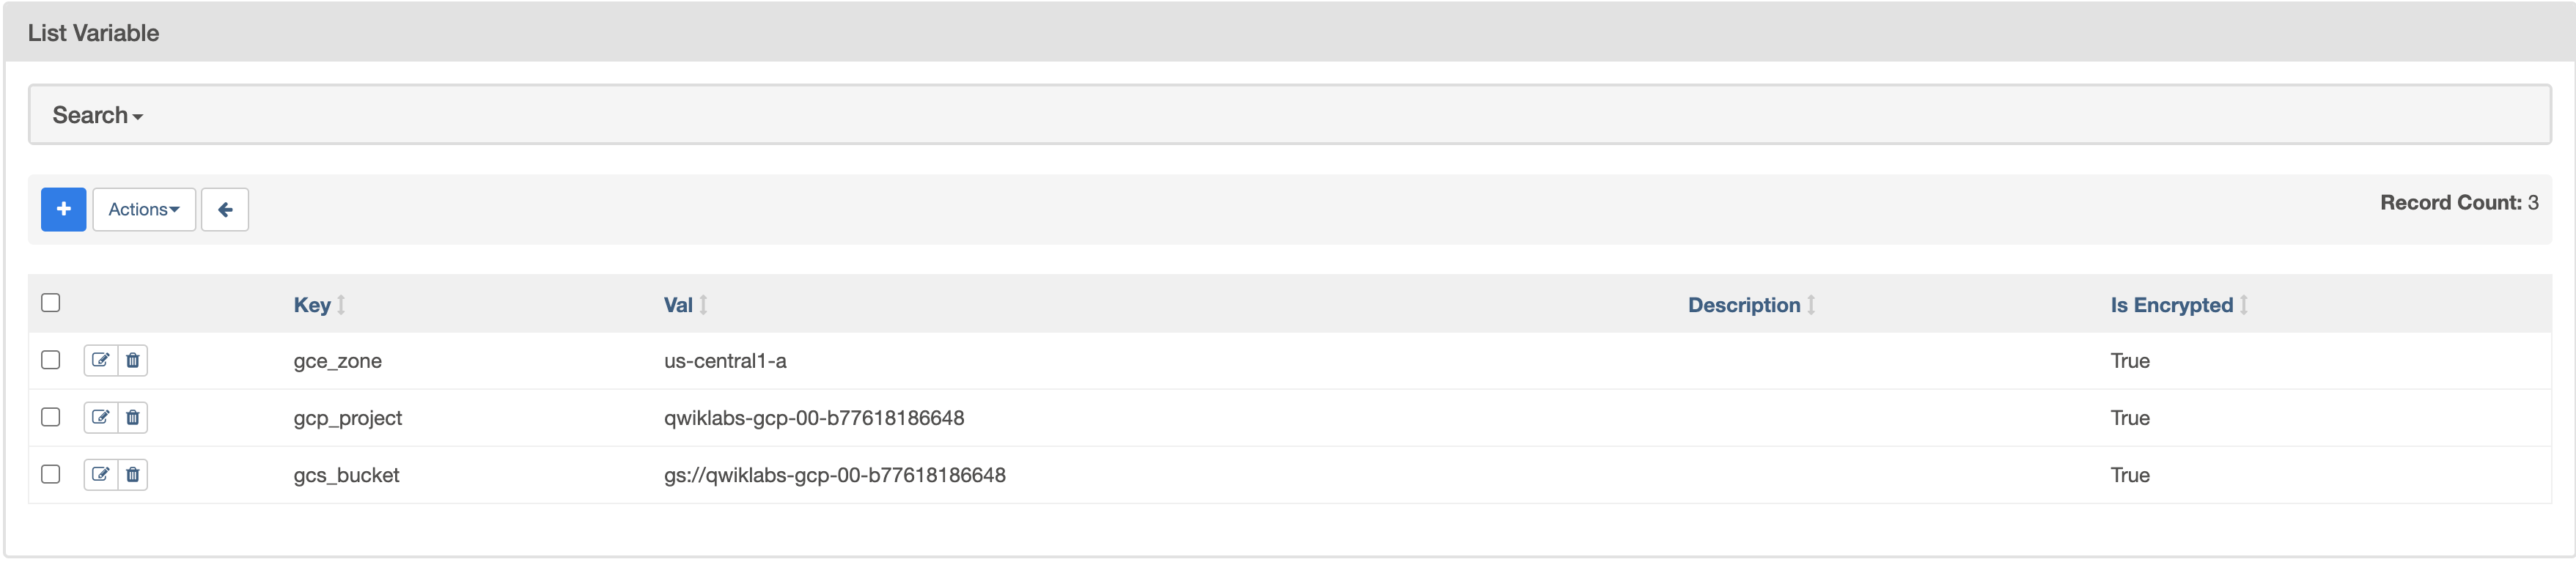
Create the following Airflow variables,
gcp_project,gcs_bucket, andgce_zone:
|
KEY |
VALUE |
Details |
|
|
|
The Google Cloud project you're using for this quickstart. |
|
|
gs:// |
This is the name of the Cloud Storage bucket you made earlier, which should be the same as your Project ID unless you changed it. This bucket stores the output from the Hadoop jobs from Dataproc. |
|
|
|
This is the Compute Engine zone where your Cloud Dataproc cluster will be created. To chose a different zone, see Available regions & zones. |
Your Variables table should look like this when you're finished:
Task 7. Uploading the DAG to Cloud Storage
To upload the DAG, you will upload a copy of the hadoop_tutorial.py file to the Cloud Storage bucket that was automatically created when you created the environment.
-
You can check that by going to Composer > Environments.
-
Click on the environment you created earlier, this will get you to the details of the environment you created.
-
Click on Environment Configuration.
-
Find
DAGs folder, copy the value to replace<DAGs_folder_path>in the following command and run it in Cloud Shell:
Cloud Composer adds the DAG to Airflow and schedules the DAG automatically. DAG changes occur within 3-5 minutes. The workflow will now be referred to as composer_hadoop_tutorial.
You will be able to see the task status in the Airflow web interface.
Click Check my progress to verify the objective.
Exploring DAG runs
When you upload your DAG file to the dags folder in Cloud Storage, Cloud Composer parses the file. If no errors are found, the name of the workflow appears in the DAG listing, and the workflow is queued to run immediately.
Make sure that you're on the DAGs tab in the Airflow web interface. It takes several minutes for this process to complete. Refresh your browser to make sure you're looking at the latest information.
-
In Airflow, click composer_hadoop_tutorial to open the DAG details page. This page includes a graphical representation of the workflow tasks and dependencies.
-
In the toolbar, click on Graph for graph view. Mouseover the graphic for each task to see its status. Note that the border around each task also indicates the status (green border = running; red = failed, etc.).
-
If required, turn on Auto refresh or click the Refresh icon to make sure you're looking at the most recent information. The boarders of the processes change colors as the state of the process changes.
If the color around create_dataproc_cluster has changed and the state is other than "running" then, run the workflow again from the Graph view. If the state is "running" then no need to perform below 3 steps.
- Click the create_dataproc_cluster graphic.
- Click Clear to reset the three tasks.
- Then click OK to confirm.
Notice that the color around create_dataproc_cluster has changed and the state is "running".
You can also monitor the process in the Cloud Console.
- Once the status for create_dataproc_cluster has changed to "running", go to Navigation menu > Dataproc, then click on:
- Clusters to monitor cluster creation and deletion. The cluster created by the workflow is ephemeral: it only exists for the duration of the workflow and is deleted as part of the last workflow task.
- Jobs to monitor the Apache Hadoop wordcount job. Click the Job ID to see job log output.
-
Once Dataproc gets to a state of "Running", return to Airflow and click Refresh to see that the cluster is complete.
-
When the
run_dataproc_hadoopprocess is complete, go to Navigation menu > Cloud Storage > Buckets and click on the name of your bucket to see the results of the wordcount in thewordcountfolder.
Click Check my progress to verify the objective.
Test your knowledge
Test your knowledge about Google cloud Platform by taking our quiz.
Delete Cloud Composer Environment
-
Return to the Environments page in Composer.
-
Select the checkbox next to your Composer environment.
-
Click DELETE.
-
Confirm the pop-up by clicking DELETE again.
Congratulations!
Congratulations! In this lab, you created a Cloud Composer environment, uploaded a DAG to Cloud Storage, and ran a workflow that created a Cloud Dataproc cluster, ran a Hadoop wordcount job, and deleted the cluster. You also learned about Airflow and core concepts, and explored the Airflow web interface. You can now use Cloud Composer to create and manage your own workflows.
Next steps
This lab is part of a series of labs called Qwik Starts. These labs are designed to give you a little taste of the many features available with Google Cloud. Search for "Qwik Starts" in the lab catalog to find the next lab you'd like to take!
- To see the value of a variable, run the Airflow CLI sub-command variables with the get argument or use the Airflow web interface.
- For information about the Airflow web interface, see Accessing the web interface.
Google Cloud training and certification
...helps you make the most of Google Cloud technologies. Our classes include technical skills and best practices to help you get up to speed quickly and continue your learning journey. We offer fundamental to advanced level training, with on-demand, live, and virtual options to suit your busy schedule. Certifications help you validate and prove your skill and expertise in Google Cloud technologies.
Manual Last Updated March 11, 2024
Lab Last Tested March 11, 2024
Copyright 2024 Google LLC All rights reserved. Google and the Google logo are trademarks of Google LLC. All other company and product names may be trademarks of the respective companies with which they are associated.