Checkpoints
Disable and re-enable the Dataflow API
/ 20
Create a BigQuery Dataset (name: taxirides)
/ 20
Create a table in BigQuery Dataset
/ 20
Create a Cloud Storage bucket
/ 20
Run the Pipeline
/ 20
Dataflow: Qwik Start - Templates
- GSP192
- Overview
- Setup
- Task 1. Ensure that the Dataflow API is successfully re-enabled
- Task 2. Create a BigQuery dataset, BigQuery table, and Cloud Storage bucket using Cloud Shell
- Task 3. Create a BigQuery dataset, BigQuery table, and Cloud Storage bucket using the Google Cloud console
- Task 4. Run the pipeline
- Task 5. Submit a query
- Task 6. Test your understanding
- Congratulations!
GSP192

Overview
In this lab, you learn how to create a streaming pipeline using one of Google's Dataflow templates. More specifically, you use the Pub/Sub to BigQuery template, which reads messages written in JSON from a Pub/Sub topic and pushes them to a BigQuery table. You can find the documentation for this template in the Get started with Google-provided templates Guide.
You are given the option to use the Cloud Shell command line or the Cloud console to create the BigQuery dataset and table. Pick one method to use, then continue with that method for the rest of the lab. If you want experience using both methods, run through this lab a second time.
What you'll do
- Create a BigQuery dataset and table
- Create a Cloud Storage bucket
- Create a streaming pipeline using the Pub/Sub to BigQuery Dataflow template
Setup
Before you click the Start Lab button
Read these instructions. Labs are timed and you cannot pause them. The timer, which starts when you click Start Lab, shows how long Google Cloud resources will be made available to you.
This hands-on lab lets you do the lab activities yourself in a real cloud environment, not in a simulation or demo environment. It does so by giving you new, temporary credentials that you use to sign in and access Google Cloud for the duration of the lab.
To complete this lab, you need:
- Access to a standard internet browser (Chrome browser recommended).
- Time to complete the lab---remember, once you start, you cannot pause a lab.
How to start your lab and sign in to the Google Cloud console
-
Click the Start Lab button. If you need to pay for the lab, a pop-up opens for you to select your payment method. On the left is the Lab Details panel with the following:
- The Open Google Cloud console button
- Time remaining
- The temporary credentials that you must use for this lab
- Other information, if needed, to step through this lab
-
Click Open Google Cloud console (or right-click and select Open Link in Incognito Window if you are running the Chrome browser).
The lab spins up resources, and then opens another tab that shows the Sign in page.
Tip: Arrange the tabs in separate windows, side-by-side.
Note: If you see the Choose an account dialog, click Use Another Account. -
If necessary, copy the Username below and paste it into the Sign in dialog.
{{{user_0.username | "Username"}}} You can also find the Username in the Lab Details panel.
-
Click Next.
-
Copy the Password below and paste it into the Welcome dialog.
{{{user_0.password | "Password"}}} You can also find the Password in the Lab Details panel.
-
Click Next.
Important: You must use the credentials the lab provides you. Do not use your Google Cloud account credentials. Note: Using your own Google Cloud account for this lab may incur extra charges. -
Click through the subsequent pages:
- Accept the terms and conditions.
- Do not add recovery options or two-factor authentication (because this is a temporary account).
- Do not sign up for free trials.
After a few moments, the Google Cloud console opens in this tab.

Activate Cloud Shell
Cloud Shell is a virtual machine that is loaded with development tools. It offers a persistent 5GB home directory and runs on the Google Cloud. Cloud Shell provides command-line access to your Google Cloud resources.
- Click Activate Cloud Shell
at the top of the Google Cloud console.
When you are connected, you are already authenticated, and the project is set to your Project_ID,
gcloud is the command-line tool for Google Cloud. It comes pre-installed on Cloud Shell and supports tab-completion.
- (Optional) You can list the active account name with this command:
- Click Authorize.
Output:
- (Optional) You can list the project ID with this command:
Output:
gcloud, in Google Cloud, refer to the gcloud CLI overview guide.
Task 1. Ensure that the Dataflow API is successfully re-enabled
To ensure access to the necessary API, restart the connection to the Dataflow API.
-
In the Cloud Console, enter "Dataflow API" in the top search bar. Click on the result for Dataflow API.
-
Click Manage.
-
Click Disable API.
If asked to confirm, click Disable.
- Click Enable.
When the API has been enabled again, the page will show the option to disable.
Test completed task
Click Check my progress to verify your performed task.
Task 2. Create a BigQuery dataset, BigQuery table, and Cloud Storage bucket using Cloud Shell
Let's first create a BigQuery dataset and table.
bq command-line tool. Skip down to Task 3 if you want to complete these steps using the Cloud console.
- Run the following command to create a dataset called
taxirides:
Your output should look similar to:
Test completed task
Click Check my progress to verify your performed task. If you have successfully created a BigQuery dataset, you will see an assessment score.
Now that you have your dataset created, you'll use it in the following step to instantiate a BigQuery table.
- Run the following command to do so:
Your output should look similar to:
Test completed task
Click Check my progress to verify your performed task. If you have successfully created a table in BigQuery dataset, you will see an assessment score.
On its face, the bq mk command looks a bit complicated. However, with some assistance from the BigQuery command-line documentation, we can break down what's going on here. For example, the documentation tells us a little bit more about schema:
- Either the path to a local JSON schema file or a comma-separated list of column definitions in the form
[FIELD]:[DATA_TYPE],[FIELD]:[DATA_TYPE].
In this case, we are using the latter—a comma-separated list.
Create a Cloud Storage bucket using Cloud Shell
Now that we have our table instantiated, let's create a bucket.
Use the Project ID as the bucket name to ensure a globally unique name:
- Run the following commands to do so:
Test completed task
Click Check my progress to verify your performed task. If you have successfully created a Cloud Storage bucket, you will see an assessment score.
Once you've made your bucket, scroll down to the Run the Pipeline section.
Task 3. Create a BigQuery dataset, BigQuery table, and Cloud Storage bucket using the Google Cloud console
-
From the left-hand menu, in the Big Data section, click on BigQuery.
-
Then click Done.
-
Click on the three dots next to your project name under the Explorer section, then click Create dataset.
-
Input
taxiridesas your dataset ID: -
Select us (multiple regions in United States) in Data location.
-
Leave all of the other default settings in place and click CREATE DATASET.
Test completed task
Click Check my progress to verify your performed task. If you have successfully created a BigQuery dataset, you will see an assessment score.
-
You should now see the
taxiridesdataset underneath your project ID in the left-hand console. -
Click on the three dots next to
taxiridesdataset and select Open. -
Then select CREATE TABLE in the right-hand side of the console.
-
In the Destination > Table Name input, enter
realtime. -
Under Schema, toggle the Edit as text slider and enter the following:
Your console should look like the following:
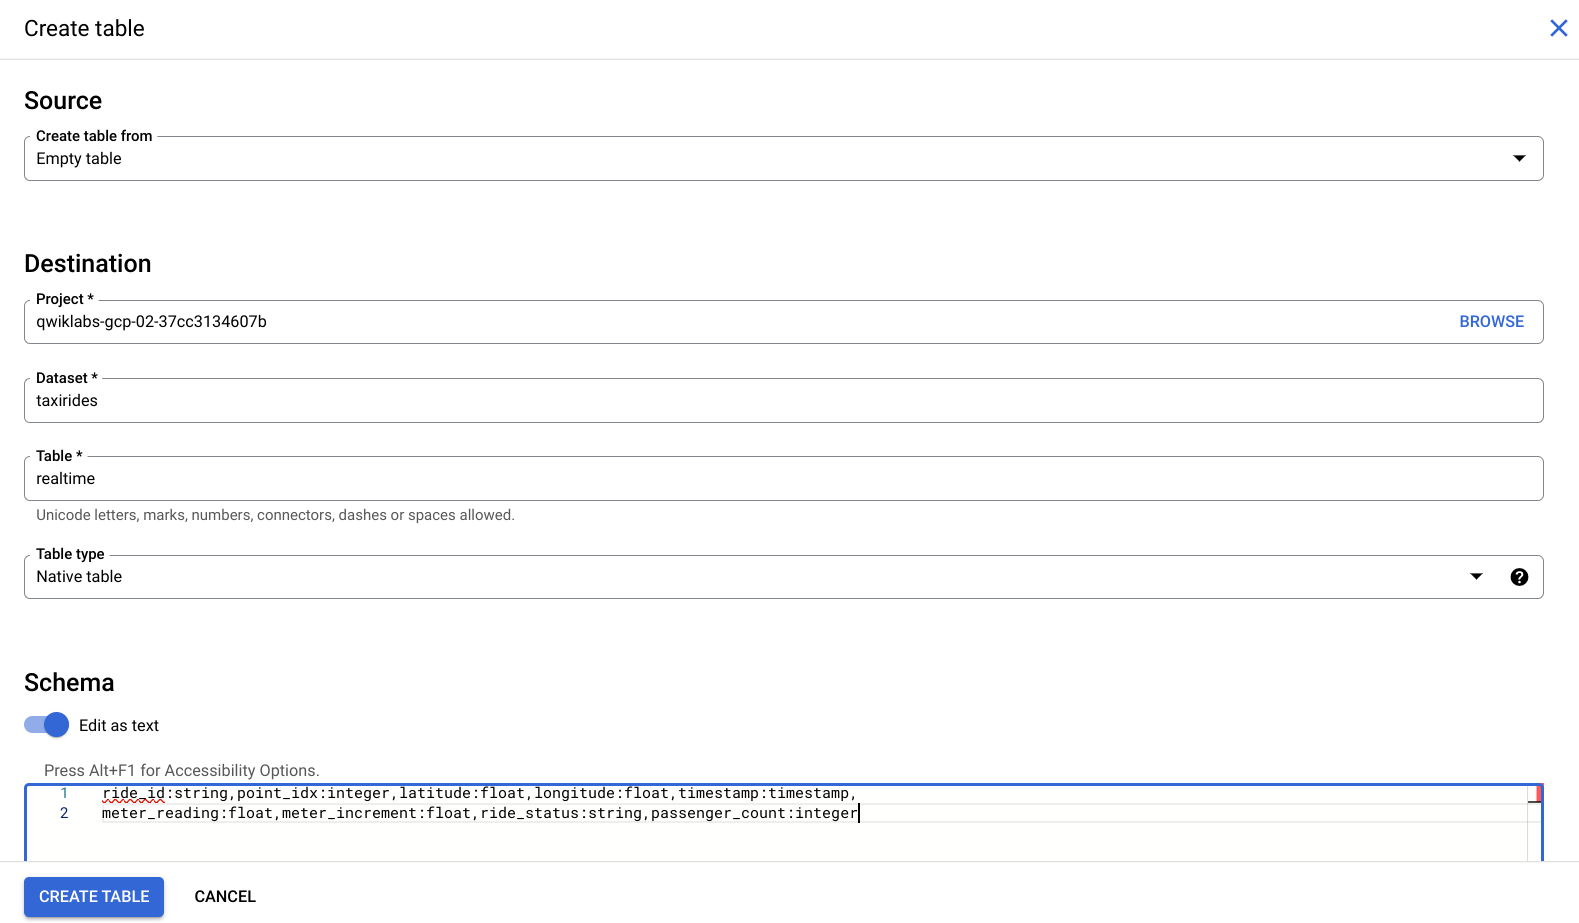
- Now, click Create table.
Test completed task
Click Check my progress to verify your performed task. If you have successfully created a table in BigQuery dataset, you will see an assessment score.
Create a Cloud Storage bucket using the Cloud console
-
Go back to the Cloud Console and navigate to Cloud Storage > Buckets > Create bucket.
-
Use the Project ID as the bucket name to ensure a globally unique name:
-
Leave all other default settings, then click Create.
Test completed task
Click Check my progress to verify your performed task. If you have successfully created a Cloud Storage bucket, you will see an assessment score.
Task 4. Run the pipeline
Deploy the Dataflow Template:
In the Google Cloud Console, on the Navigation menu, click Dataflow > Jobs, and you will see your dataflow job.
Please refer the document for more information.
Test completed task
Click Check my progress to verify your performed task. If you have successfully run the Dataflow pipeline, you will see an assessment score.
You'll watch your resources build and become ready for use.
Now, let's go view the data written to BigQuery by clicking on BigQuery found in the Navigation menu.
- When the BigQuery UI opens, you'll see the taxirides dataset added under your project name and realtime table underneath that.
Task 5. Submit a query
You can submit queries using standard SQL.
- In the BigQuery Editor, add the following to query the data in your project:
- Now click RUN.
If you run into any issues or errors, run the query again (the pipeline takes a minute to start up.)
- When the query runs successfully, you'll see the output in the Query Results panel as shown below:
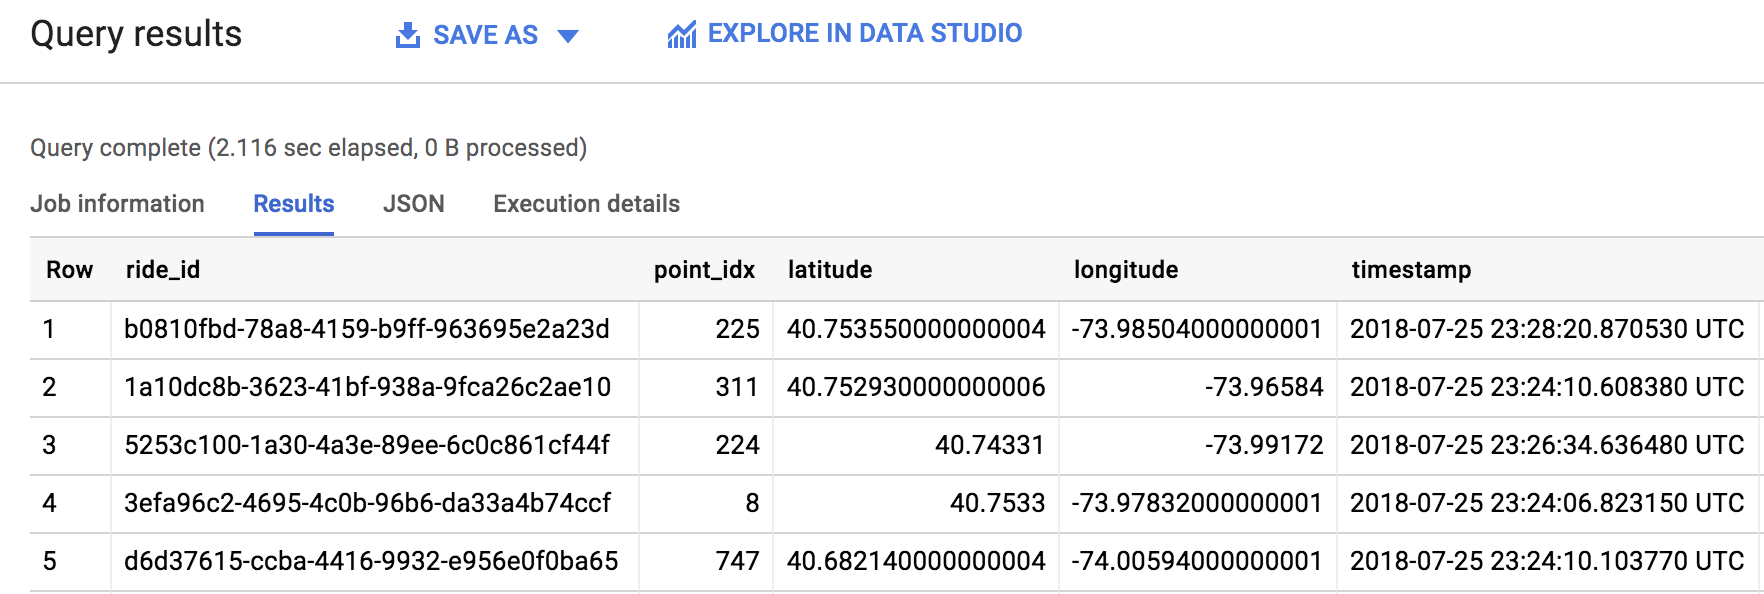
Great work! You just pulled 1000 taxi rides from a Pub/Sub topic and pushed them to a BigQuery table. As you saw firsthand, templates are a practical, easy-to-use way to run Dataflow jobs. Be sure to check out, in the Dataflow Documentation, some other Google Templates in the Get started with Google-provided templates Guide.
Task 6. Test your understanding
Below are multiple choice questions to reinforce your understanding of this lab's concepts. Answer them to the best of your abilities.
Congratulations!
You created a streaming pipeline using the Pub/Sub to BigQuery Dataflow template, which reads messages written in JSON from a Pub/Sub topic and pushes them to a BigQuery table.
Next steps / Learn more
This lab is part of a series of labs called Qwik Starts. These labs are designed to give you a little taste of the many features available with Google Cloud. Search for "Qwik Starts" in the Google Cloud Skills Boost catalog to find the next lab you'd like to take!
Google Cloud training and certification
...helps you make the most of Google Cloud technologies. Our classes include technical skills and best practices to help you get up to speed quickly and continue your learning journey. We offer fundamental to advanced level training, with on-demand, live, and virtual options to suit your busy schedule. Certifications help you validate and prove your skill and expertise in Google Cloud technologies.
Manual Last Updated February 04, 2024
Lab Last Tested November 10, 2023
Copyright 2024 Google LLC All rights reserved. Google and the Google logo are trademarks of Google LLC. All other company and product names may be trademarks of the respective companies with which they are associated.